Automations
Overview
The Automations page is your control center for automating repetitive tasks and streamlining data management across your TRES platform. By creating automated workflows based on defined conditions, you can significantly reduce manual work, ensure consistency, and save time in financial operations.
Automations enable you to:
Automatically tag transactions based on conditions (wallet, platform, asset, contact, etc.).
Generate recurring reports on a scheduled basis.
Create transaction roll-ups to consolidate transactions for a cleaner ledger.
All automations run automatically based on the conditions you define, ensuring consistent data management.
Page Structure and Automation Cards
The Automations page displays all your configured automations in a list format, allowing you to see their status and key settings at a glance.
Automation Card Details
Each card provides a summary of the automation's function:
Automation Name - The primary action being executed.
Description/Conditions - The specific criteria that trigger the automation.
Priority - The execution order of the automation (High, Medium, or Low).
High Priority: Executed first and most frequently. Use for critical, compliance-related tagging.
Medium Priority: Standard execution frequency and order. Use for regular operational tasks.
Low Priority: Executed last. Use for background processing or non-urgent categorizations.
Status - The current state: ACTIVE, PAUSED, or INACTIVE.
Creation Date - The date the automation was created.

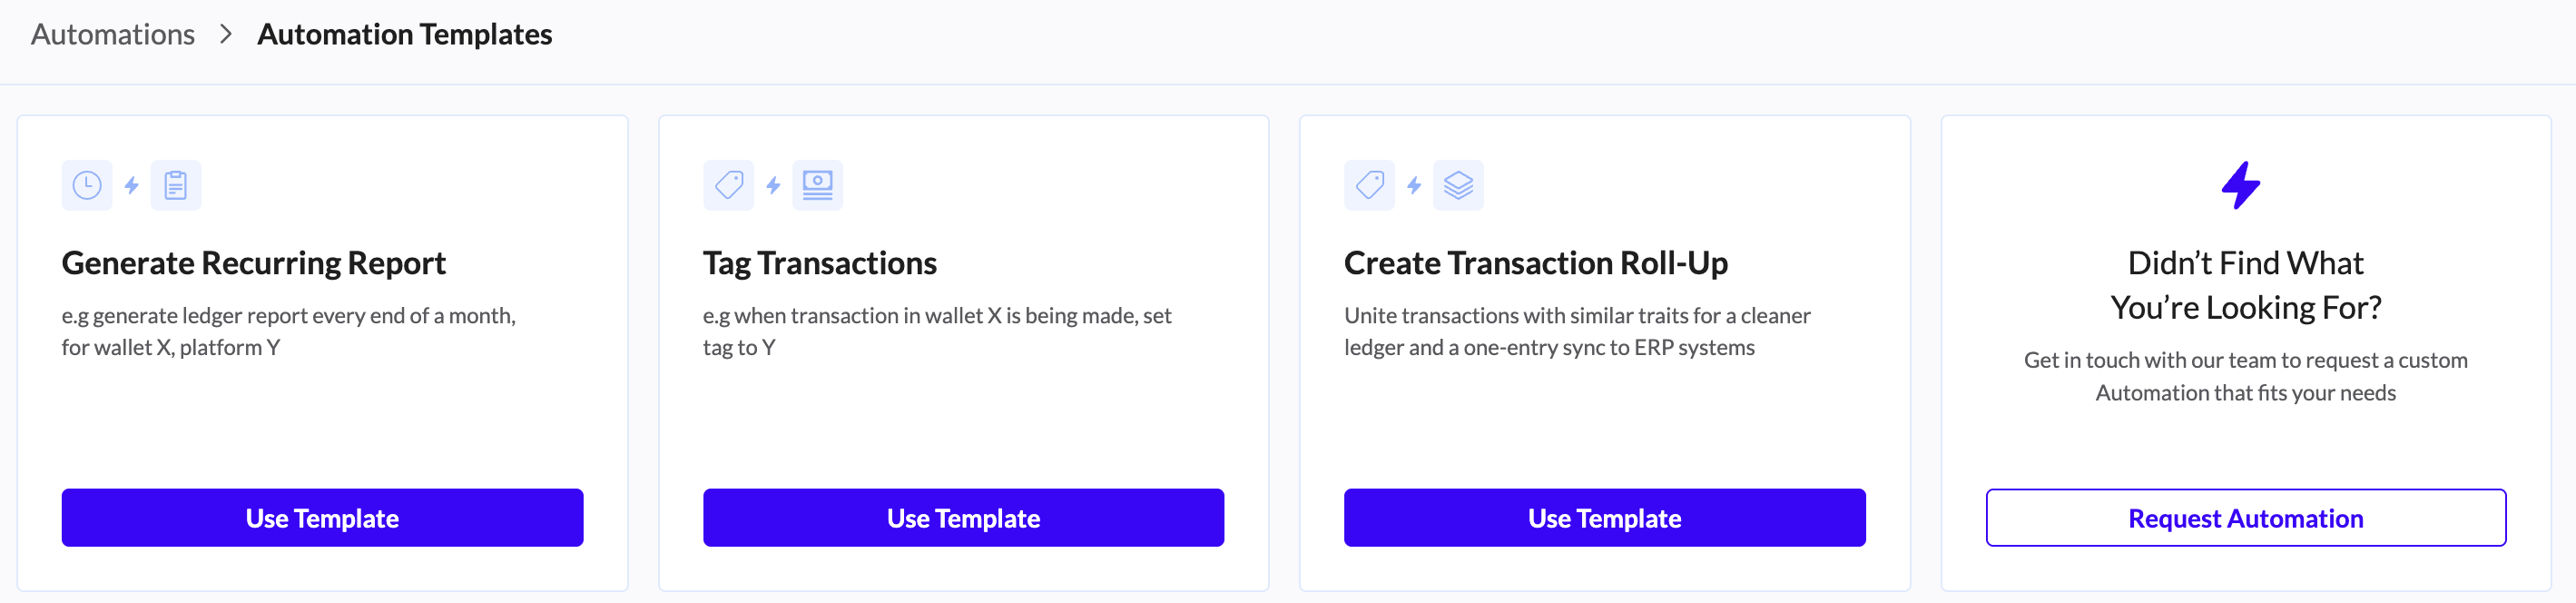
Available Automation Types
Generate Recurring Report
Purpose: Automatically generate and deliver reports on a predefined schedule.
Key Features: Schedule reports (daily, weekly, monthly, etc.), define specific filters, and automatically deliver reports to specified recipients.
Example Scenarios: Monthly ledger report for all Ethereum transactions, or a quarterly cost basis summary.
Tag Transactions
Purpose: Automatically apply tags to transactions based on defined conditions.
Conditions Supported: Platform, Asset, Wallet, Contact, Method ID (smart contract interaction), and applying a previously Saved filter view.
Example Scenarios: Tag all transactions from a specific wallet group as "Marketing Expenses", or tag transactions with a specific Method ID as "Staking Rewards".
Create Transaction Roll-Up
Purpose: Unite transactions with similar traits into a single entry for a cleaner ledger and simplified ERP sync.
Key Features: Group similar transactions (e.g., small gas fees) together, reduce ledger clutter, and define grouping criteria (date range, asset, tag).
Example Scenarios: Roll up all daily USDC transfers from various exchanges into a single weekly entry.
Generating Recurring Reports
The Generate Recurring Report automation allows you to schedule the automatic creation and delivery of standard reports. This eliminates the need to manually export the same ledger or balance sheet every month.
Step 1: Choose the Template
Click the "Add Automation" button.
Select the "Generate Recurring Report" template.
Click "Use Template".
Step 2: Configure Report Settings
Define exactly what data you want to capture in the report.
Select Report Type: Choose the specific report template (e.g., "Transaction Ledger", "Balance Trends", or "Cost Basis").
Set Filters: Apply filters to narrow down the data. Common filters include:
Platform/Network: (e.g., only Ethereum transactions).
Wallets: (e.g., specific Treasury wallets).
Date Range: (e.g., "Last Month" or "Year to Date").
Step 3: Define Schedule & Delivery
Decide when the report runs and who receives it.
Set Schedule: Choose the frequency (e.g., Daily, Weekly, Monthly, Quarterly).
Tip: For monthly accounting, set it to run on the 1st of every month.
Add Recipients: Enter the email addresses of the team members or external accountants who should receive the report automatically.
Step 4: Activate
Name the Automation: Give it a clear name (e.g., "Monthly Treasury Ledger - Ethereum").
Click "Create" to activate the schedule.
Tag Transactions Automation
Scenario Example:
Goal: Automatically tag all cryptocurrency received from a specific, approved exchange (e.g., Coinbase) to a dedicated "Treasury Inflow" activity tag, and set the priority to High.
Step 1. Choose the Template
Click the "Add Automation" button in the page header.
Select the "Tag Transactions" template.
Click "Use Template".
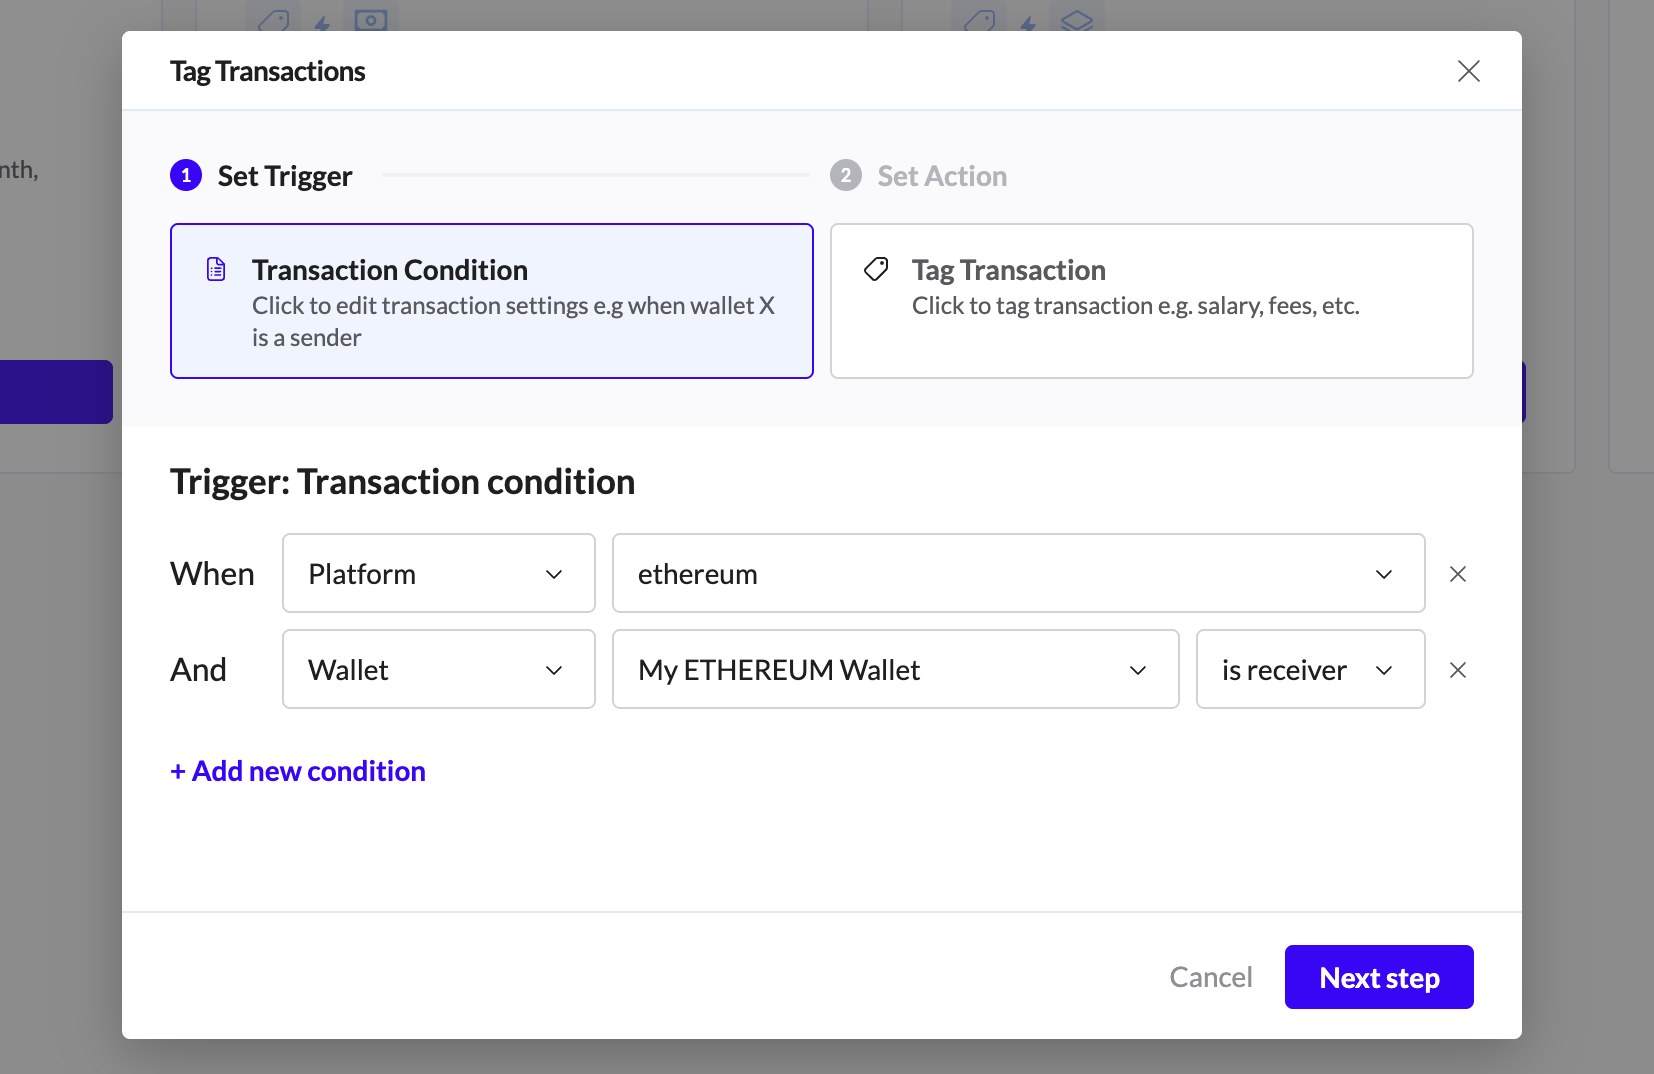
Step 2. Configure Conditions (The "Set Trigger" Logic)
This is where you define the criteria that must be met for the tag to be applied.
Select Criteria: Define the specific data points that trigger the rule. Options include:
Platform (e.g., specific blockchain network)
Asset (e.g., BTC, specific token)
Wallet (e.g., a specific wallet address or group)
Contact (e.g., a known counterparty)
Method ID (e.g., smart contract interaction)
Saved Filter View (e.g., using a custom-saved search)
Add Filters: Use the "Add new condition" option to create precise rules using multiple conditions simultaneously (e.g.,
When Asset is X AND Network is Y).
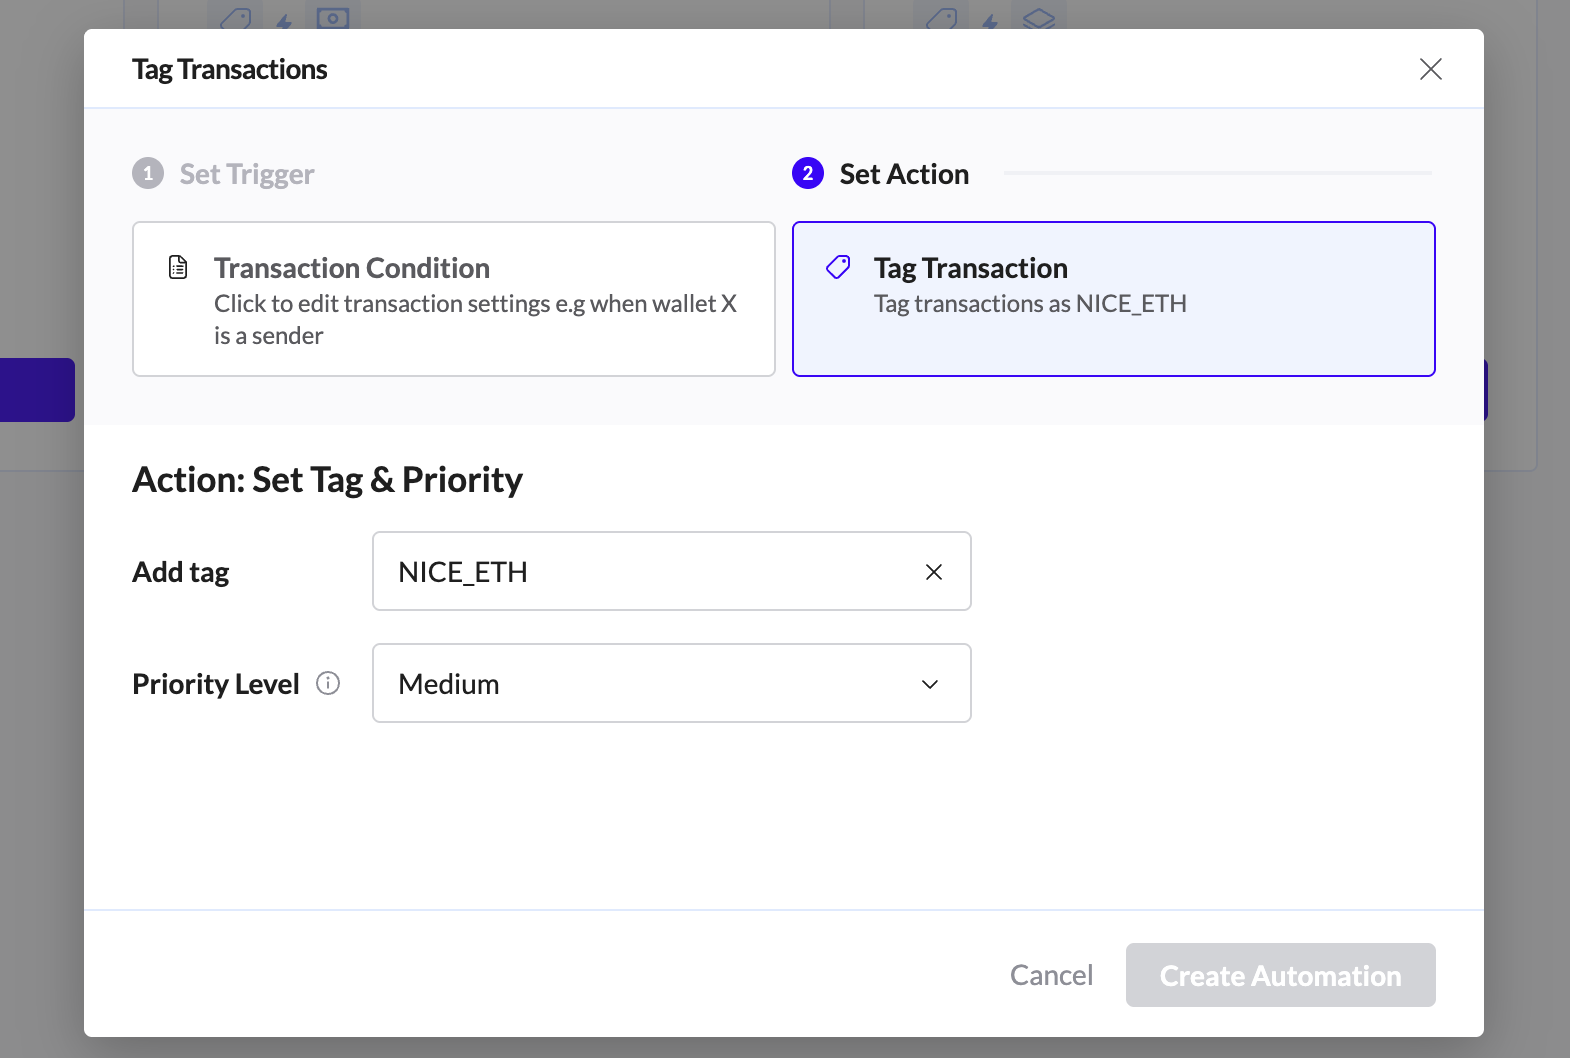
Step 3. Define the Action (The "Set Action" Logic)
This defines what label to apply when the conditions are met.
Set Tag: Select the specific tag you want to apply.
Set Priority: Assign the execution priority level (High, Medium, or Low).
Note: High Priority rules execute first and are used for critical, compliance-related, or essential tagging.
Step 4: Activate and Manage
Click "Create" or "Activate".
The rule will become ACTIVE in your list and automatically apply the tag to all new matching transactions.
Tag reflection in the Ledger:
When a tag is applied to a transaction by an automation, hovering over that tag will display a tooltip indicating the specific automation rule that generated it.
The automation icon next to the tag offers convenient shortcut access to edit the automation rule responsible for the tag's creation.

When a tag is manually set, hovering over it displays its source. An adjacent automation icon offers a pathway to instantly configure a new automation rule using the manual tag as a starting point.

Tags applied via 'Classification' are automatically generated when a transaction aligns with TRES’s proprietary matching and categorization rules. A description of the specific matching criteria or logic appears below.

Creating Transaction Roll-Ups
The Create Transaction Roll-Up automation is designed to declutter your ledger. It consolidates multiple small, similar transactions (like daily mining rewards or gas fees) into a single summary entry, which is much easier to sync to your ERP.
Step 1: Choose the Template
Click the "Add Automation" button.
Select the "Create Transaction Roll-Up" template.
Click "Use Template".
Step 2: Define Grouping Criteria (The "What")
Identify which transactions should be bundled together.
Select Criteria: Choose the shared traits for the transactions you want to group.
Asset: (e.g., group only USDC transactions).
Activity: (e.g., group all Trading or Gas Fee activities).
Platform: (e.g., group all Polygon network activity).
Step 3: Configure Roll-Up Settings (The "How")
Determine the timeframe and export behavior.
Frequency: Set how often the roll-up happens (e.g., Daily, Weekly, Monthly).
Example: "Consolidate all daily DEX trades into one Weekly entry."
Export Settings: Define how the consolidated entry should appear when exported or synced to your ERP (ensuring it maps to the correct single journal entry).
Step 4: Activate
Name the Automation: Name it clearly (e.g., "Weekly Gas Fee Roll-Up").
Click "Create" to start the consolidation process for future transactions.